Reading PIR Sensors
Connecting PIR sensors to a microcontroller is really simple. The PIR acts as a digital output so all you need to do is listen for the pin to flip high (detected) or low (not detected).
Its likely that you'll want reriggering, so be sure to put the jumper in the H position!
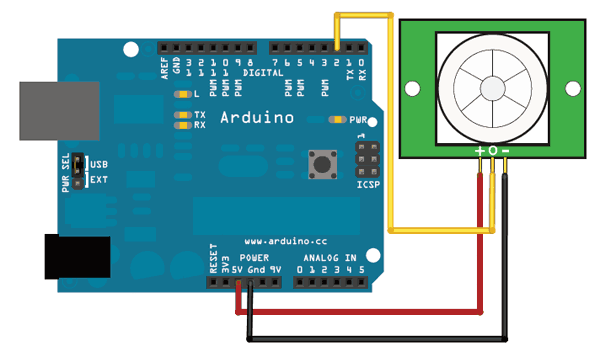
Power the PIR with 5V and connect ground to ground. Then connect the output to a digital pin. In this example we'll use pin 2.
The code is very simple, and is basically just keeps track of whether the input to pin 2 is high or low. It also tracks the state of the pin, so that it prints out a message when motion has started and stopped.
Code
- /*
- * PIR sensor tester
- */
- int ledPin = 13; // choose the pin for the LED
- int inputPin = 2; // choose the input pin (for PIR sensor)
- int pirState = LOW; // we start, assuming no motion detected
- int val = 0; // variable for reading the pin status
- void setup() {
- pinMode(ledPin, OUTPUT); // declare LED as output
- pinMode(inputPin, INPUT); // declare sensor as input
- Serial.begin(9600);
- }
- void loop(){
- val = digitalRead(inputPin); // read input value
- if (val == HIGH) { // check if the input is HIGH
- digitalWrite(ledPin, HIGH); // turn LED ON
- if (pirState == LOW) {
- // we have just turned on
- Serial.println("Motion detected!");
- // We only want to print on the output change, not state
- pirState = HIGH;
- }
- } else {
- digitalWrite(ledPin, LOW); // turn LED OFF
- if (pirState == HIGH){
- // we have just turned of
- Serial.println("Motion ended!");
- // We only want to print on the output change, not state
- pirState = LOW;
- }
- }
- }

No comments:
Post a Comment